No Bake Cherry Cheesecake

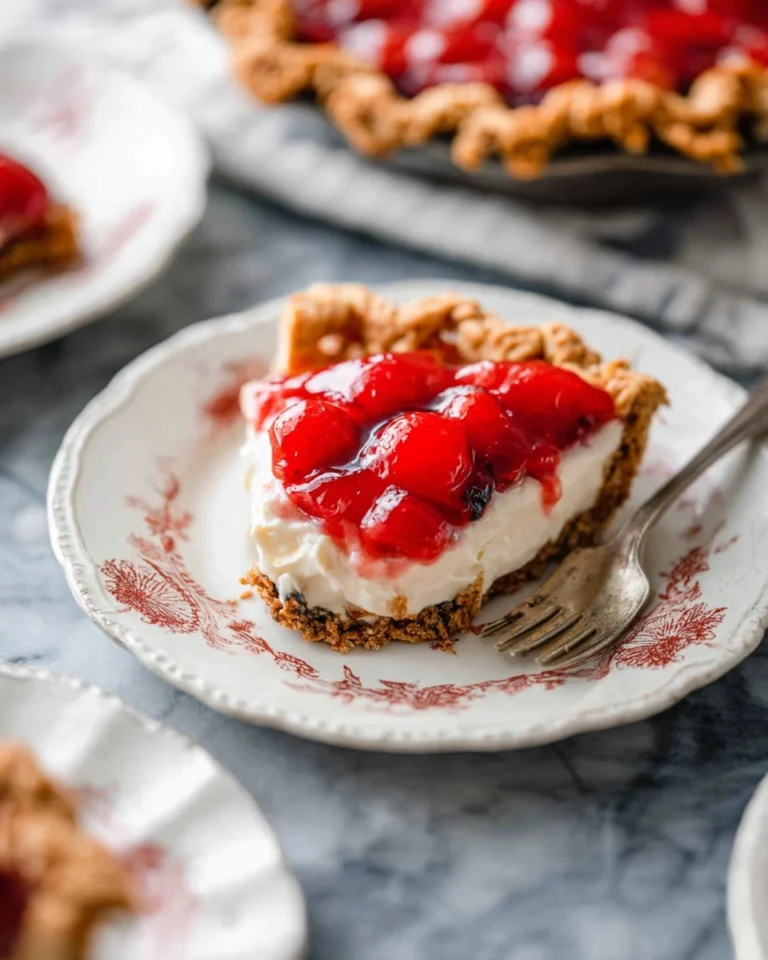
No matter the season, a slice of creamy cheesecake is a delightful treat that everyone craves. With its velvety texture and refreshing taste, my No Bake Cherry Cheesecake has become the go-to dessert for gatherings and cozy nights at home alike. It’s a dessert that hits just the right notes. Picture this: a smooth, creamy layer of cheesecake, topped with vibrant cherry pie filling and nestled in a buttery graham cracker crust. It offers the perfect balance of sweet and tart, making each bite an experience.
Table of Contents
This recipe is so straightforward and user-friendly that even cooking novices can manage it. There’s no need for baking, ensuring a hassle-free process that fits into your busy life. You can whip it together in less than 30 minutes and then let it chill while you anticipate that first slice. Trust me, once you try this no bake cherry cheesecake, you’ll be asking yourself how you ever lived without it.
Why You’ll Love This Recipe
- Simple & Quick: Ready in under 30 minutes and requires no baking!
- Irresistible Flavor: The combination of creamy cheesecake and tart cherries creates a mouthwatering delight.
- Eye-Catching Appeal: Gorgeous and impressive, this dessert is a show-stopper at any gathering.
- Flexible Serving: Perfect for any occasion, from family dinners to potlucks or even a late-night snack.
- Diet-Friendly Options: Consider using a gluten-free crust or sugar substitutes for various dietary needs.
Ingredients You’ll Need
- 9″ graham cracker crust: Whether you buy one or make your own, it’s the perfect starting point for this dessert. A homemade crust can add a personal touch.
- 8 oz. cream cheese, softened: This creamy base gives your cheesecake its luscious texture. Make sure it’s at room temperature for easy mixing.
- 1 cup powdered sugar: This sweetens your cheesecake without the graininess of granulated sugar, giving it a lovely smoothness.
- 1 tsp vanilla extract: A must-have for enhancing the flavor of the cream cheese mixture.
- 1 cup heavy cream: Whipping this cream adds air to the cheesecake, creating that dreamy, fluffy texture.
- 21 oz. cherry pie filling: This delicious topping brings burst of flavor and beautiful color to your cheesecake.
How to Make No Bake Cherry Cheesecake
- Prepare the crust: If you’re making a homemade crust, blend crushed graham crackers with melted butter until it resembles wet sand. Press firmly into a 9″ pie pan. If using a store-bought crust, move on to the next step.
- Mix the cream cheese: In a medium bowl, combine 8 oz. softened cream cheese, 1 cup powdered sugar, and 1 tsp vanilla extract. Use a hand mixer or stand mixer to whisk until the mixture is smooth and free of lumps.
- Whip the cream: In a separate large bowl, pour in 1 cup heavy cream. Using a mixer, whip on low speed, gradually increasing to high. Continue until stiff peaks form, about 5 minutes. You want it to hold its shape and not be too runny.
- Combine mixtures: Gently fold the whipped cream into the cream cheese mixture with a rubber spatula. Be patient; you want to maintain that light, airy texture while mixing thoroughly.
- Chill: Pour the cheesecake mixture into the prepared crust, smoothing the top with a spatula. Refrigerate for at least 4 hours or overnight to allow it to set fully.
- Add cherry topping: Once set, pour 21 oz. cherry pie filling over the top of the cheesecake. Slice into wedges and enjoy your delightful creation!
Storing & Reheating
To store your No Bake Cherry Cheesecake, keep it in an airtight container in the refrigerator where it will remain fresh for up to 5 days. If you need longer storage, you might consider freezing it. Wrap tightly in plastic wrap and then foil, storing it in the freezer for up to 3 months. When you’re ready to enjoy it again, let it thaw in the refrigerator for a few hours. Note that while freezing may alter the texture slightly, it will still taste delicious. A quick whip of extra cream can refresh it!
Chef’s Helpful Tips
- Avoid over-mixing the whipped cream; it can turn grainy if whipped too much.
- Be sure your cream cheese is softened to room temperature—this helps it blend smoothly with the other ingredients.
- If you want a richer cheesecake, consider substituting part of the heavy cream with sour cream or Greek yogurt.
- For a decorative and flavorful twist, add a sprinkle of lemon zest or a dash of almond extract to the cheesecake mixture.
- Make the cheesecake a day ahead; the flavors deepen, and it sets beautifully overnight.
The fluffy texture, irresistible flavor, and ease of preparation make this No Bake Cherry Cheesecake life’s simple pleasures. From family celebrations to everyday indulgences, you’ll find endless occasions to dig into this luscious dessert. Don’t hesitate to break out the ingredients and create your version soon!
Recipe FAQs
Can I use different fruits in this cheesecake?
Absolutely! While cherry pie filling is a classic topping, feel free to experiment with your favorite fruits. Blueberries, strawberries, or raspberries are all wonderful choices. Just make sure to adjust the sweetness based on the tartness of the fruits.
How long should I let the cheesecake chill?
For the best results, aim to chill your No Bake Cherry Cheesecake for at least 4 hours or, ideally, overnight. This allows it sufficient time to firm up, making slicing easier and enhancing the flavors.
Can I make this cheesecake ahead of time?
Yes, you can! This cheesecake is perfect for make-ahead desserts. You can prepare and refrigerate it a day or two in advance. Just wait to add the cherry topping until you’re ready to serve for freshness.
What’s the best way to serve this cheesecake?
Slice it with a warm knife for cleaner edges and a beautiful presentation. Accompany each slice with fresh whipped cream or a side of chocolate sauce for an extra indulgence—perfect for parties or special occasions!
PrintMore Desserts & Appetizers Recipes
- Amazing Caramel Apple Cheesecake
- Easy Strawberry Galette (no pie pan needed)
- Chocolate Cake Chocolate Ice Cream
- Vegan Strawberry Pie Cookies
- Apple Blueberry Pie with Flaky Lattice Crust
Did You Enjoy Making This Recipe? Please rate this recipe with ⭐⭐⭐⭐⭐ or leave a comment.
📖 Recipe Card
No Bake Cherry Cheesecake
- Prep Time: 15 minutes
- Cook Time: 0 minutes
- Total Time: 15 minutes
- Yield: 8 servings 1x
- Category: Desserts
- Method: No bake
- Cuisine: American
Description
This No Bake Cherry Cheesecake is a scrumptious dessert featuring rich cream cheese and a luscious cherry topping. With minimal prep and no baking required, it’s perfect for quick entertaining or satisfying your sweet tooth!
Ingredients
- 1 9" graham cracker crust
- 8 oz. cream cheese, softened
- 1 cup powdered sugar
- 1 tsp vanilla extract
- 1 cup heavy cream
- 21 oz. cherry pie filling
Instructions
- Prepare the crust, or use a store-bought one if preferred.
- In a medium bowl, combine cream cheese, powdered sugar, and vanilla extract; whisk until smooth.
- In a large bowl, whip the heavy cream on low speed, gradually increasing to high, until stiff peaks form, about 5 minutes.
- Fold the whipped cream into the cream cheese mixture gently with a rubber spatula.
- Pour the combined mixture into the prepared pie crust and smooth the top.
- Chill the cheesecake in the refrigerator for at least 4 hours or overnight.
- Top the cheesecake with the cherry pie filling before serving.
Notes
Ensure the cream cheese is fully softened for easy mixing.
Chilling the cheesecake overnight enhances its flavors and texture.
Feel free to substitute other fruit toppings for variety.
Nutrition
- Serving Size: 1 slice
- Calories: 350
- Sugar: 23g
- Sodium: 250mg
- Fat: 20g
- Saturated Fat: 12g
- Unsaturated Fat: 8g
- Trans Fat: 0g
- Carbohydrates: 36g
- Fiber: 0g
- Protein: 4g
- Cholesterol: 80mg